In order to collaborate with others on a Git project, you will need to sync your local repository with a remote repository. This can be done using the git pull and git push commands. For more information on the git pull command, please see our previous tutorial. Today’s tutorial will cover the use of the git push command.
Before starting this post, we assume that you are comfortable with the command line and familiar with at least the most basic Git commands. You will also need a GitHub account; create one now if you don’t already.
| Post Type: | GIT Tutorial |
| Published On: | www.softwaretestingo.com |
| Applicable For: | Freshers & Experience |
| Get Updates: | Join Our Telegram Group |
What Does a Git Push Do?
If you’re working with others, using a version control system like GitHub is the best way to get your changes to them. This will allow you to track your changes and push them remotely so that everyone can access your code’s latest version. Even if you’re working alone, you can still use version control by using a service like Bitbucket or GitLab.
If you’re working on a project with others, you’ll use the git push command to send your latest changes to the remote repository. This ensures that everyone is working with the most up-to-date version of the project.
When you execute a git push command, it pushes the changes that you’ve made on your local machine to the remote repository.
If the user makes changes to the local system, these changes will not be reflected on GitHub unless the user pushes them. If multiple users are working on one project, it is useful for them to push their code changes to a remote repository so that other members can fork and pull the changes from that repository.
Ensure that you have committed all your changes to the local repository before pushing them to the remote repository.
If you think of Git push as part of the synchronization process, it may help to understand its role. The synchronization happens between the local and remote repositories, where the source and destination may vary. There are a lot of other parts to sync, and git push is one of them because it uploads changes done on the local repository to keep the remote copy up-to-date. Once you grasp the concept, it’s nothing complicated – just like its syntax.

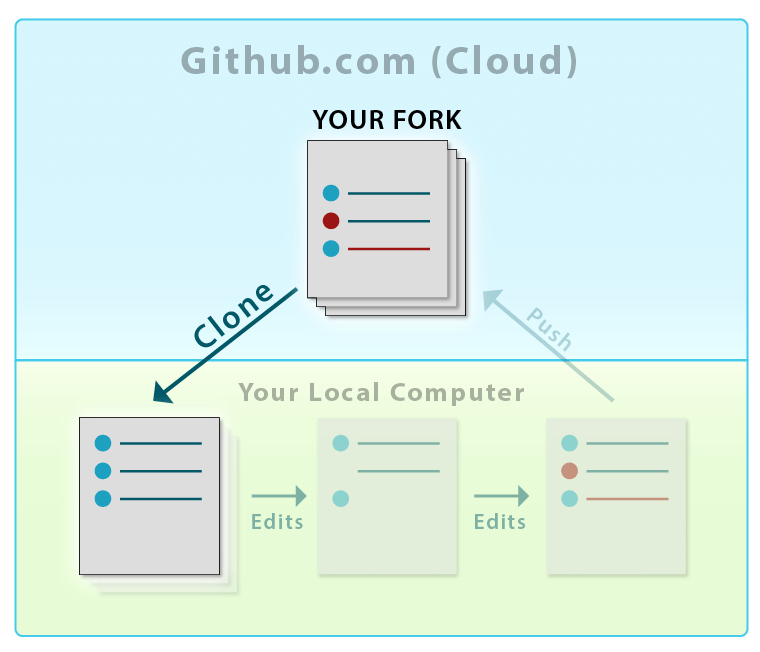
We have represented the flow in a Graphical representation for easy understanding of the flow.
- In the first step, we are cloning the repository from the GitHub version control systems.
- Thereafter, we made the changes in the local system as per our requirement and added that into the staging area.
- Once we are finalized with all the changes, we commit those changes to the local repository.
- Finally, we push the changes to the remote repository using the Git Push command. In this way, we synchronize the local repository and remote repository.
Syntax of Git Push command in Git
You have to type the Git Push command like below:
git push <remote_repo> <branch_name>
- remote_repo: This is the remote repository where we are pushing the changes.
- branch_name: This is the branch the user pushes to the remote repository.
Until this point, we have not started our discussion about the Git Branch, but in our coming blog post, we will discuss the Git branch briefly. The branches in a Git repository are just like the branches on a tree. Every branch represents a new feature or modification that is being developed. Additionally, the main branch contains stable code, just like the trunk of a tree. This helps to keep unstable code from affecting the stability of the main codebase.
How do you Push Changes from the Local Repository to the Remote Repository in Git?
In order to push changes to your remote repository, you need to first commit those changes to your local system. This section will guide you through the process of making and committing changes so that they can be reflected in the remote repository.
Make sure that you have completed the following tasks before making any changes to the repository.
- You have forked a repository to the GitHub account.
- You have cloned the same repository to the local machine.
Run the following command to check if you have a clean repository: git status. This will help ensure that there are no pending changes to commit.

If you notice the above pic, then some information we are getting about the repository like:
On branch master: This text tells you that you are currently on the master branch. Since there are no other branches yet, you are on the master branch by default.
Your branch is up to date with origin/master: Origin is the name of the remote repository that we gave while connecting the local repository with the remote repository.
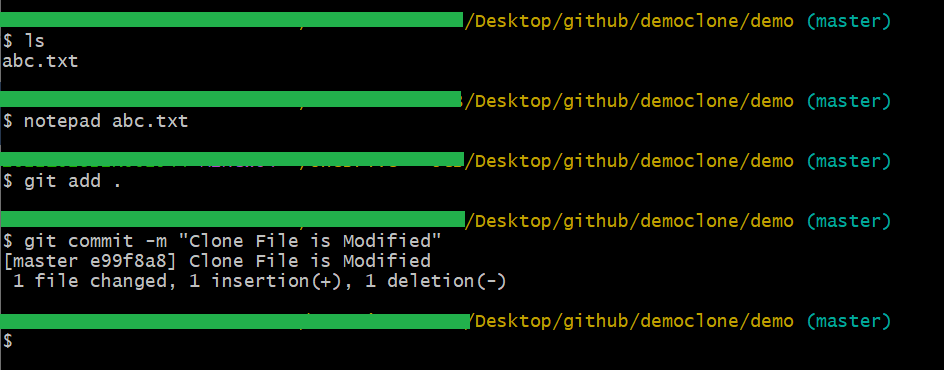
To see the content of the repository, you can use the ls command.

As there is one file in the repository, let me make some changes to its content. To make the changes to the file, you can change any of your favorite editors and make the changes to the file.
After making the changes, you can add the files to the staging area and also commit the changes.

Note: If you’re not committing your changes, GitHub won’t be able to recognize them! Make sure to commit before trying to push, or else you’ll just get an “Everything is up-to-date” message.
To push these changes into your GitHub repository, type the following command and press enter.
git push origin master

GitHub will prompt you to provide your credentials for security purposes. Simply enter your credentials and tap the Login button.
If your changes are approved and merged, you will receive the following message in Git Bash.

If you notice the last few lines, which look something like this:
To https://github.com/softwaretestingo/demo.git
e99f8a8..88137f5 master -> master
- https://github.com/softwaretestingo/demo.git: This is the repository URL where you can see the changes after the git push command.
- e99f8a8..88137f5: This text is helpful for developers who want to understand how the hash value of a commit is reflected on GitHub. The hash value of the final commit reflected on GitHub is 88137f5.
- Master -> master: The line with an arrow pointing from the “master” branch to another “master” branch shows that the source of the merge is the first master branch, and the destination of the merge is the second master branch.
The line that says “Writing Objects: 100%” is essential. In Git, you can tell whether the push command was successful by looking at this line. If it shows 100%, then all your changes have been successfully pushed to the cloud.
Options Available in Git Push command in Git
Welcome to the essential and most used options in the git push command. In this section, we will take you through all the options available so you can get started using them.
Prune Option in Git Push
This command removes any remote branches that don’t have a local counterpart. So, if you’ve got a remote branch called “demo,” but no such branch exists locally, running this command will remove the demo branch from your remotes.
git push –prune remote XYZ
Dry Run Option in Git Push
This option will execute the git push command and show you the results, but it won’t actually send any updates to the remote repository.
git push –dry-run <remote> <local_branch>
Atomic Option in Git Push
If you use the atomic option when you push to a remote repository, either every reference will be updated or none at all. This can help prevent problems if only some of your changes are pushed successfully.
git push –atomic <remote_repo> <working_branch>
All Options in Git Push
This means that all of your local changes will be sent to the remote repository.
git push –all <remote>
