Working in the main branch of a GitHub repository is dangerous as you risk pushing buggy code to production. To avoid this, create a branch and work on that.
Wouldn’t it be great if you could keep your code up-to-date without affecting the master branch? Well, with git branching, we can do that! In simple terms, Git branching is a process of creating and removing branches and listing and changing their names. With this powerful tool, we can maintain version control of your code easily and efficiently. So why wait? Let us Start to understand how to use Git branching and how to Create a Git Branch today!
| Post Type: | GIT Tutorial |
| Published On: | www.softwaretestingo.com |
| Applicable For: | Freshers & Experience |
| Get Updates: | Join Our Telegram Group |
Git Master Branch
When you create a new Git repository, you automatically get a master branch that points to the first commit ever made in that repo. Every time you make a commit, the master branch pointer moves forward automatically. You can only have one master branch in a given repository.
The Master branch is the most important branch in your project. Every change made to your codebase should eventually be merged back into this branch. This is what we call the “official working version” of your project.
Before we go ahead and create branches on our local system, it’s important that we learn how to view existing branches both locally and over the remote repository. That way, we can stay up-to-date with the project while working on our individual tasks.
How To View Local Branches In Git?
Git provides a simple command that allows us to view all the local branches. This is helpful in keeping track of synchronization between the remote and local repositories.
git branch

How To View Remote Branches In Git?
When you want to see all available branches locally and remotely, simply execute the “git branch” with the “-a” flag. Doing this will show you not only your local master branch but any other remote branches as well.
git branch -a

What is Git Branching?
Branching is one of the most powerful features in Git, and it allows developers to work on a copy of the code without changing the current version. This way, you can fix bugs or add features without worrying about breaking something already working.
How to Create a Git Branch?
If you want to create a branch in Git, first make sure that you have a clean working directory and you can verify by running the git status command. Creating branches is a simple step-by-step process.
If you want to view all of the branches in your local working repository, open Git Bash and navigate to the repository. Then, type the following command:
git branch

How To Create a Feature Branch In Git?
We are going to learn how to create a feature branch in git or create a new branch now in our local working repository. Type the following command into your terminal to create a new branch named “feature1”.
git branch <branch_name>

There are a few different ways you can create branches in Git, but we’ll start with the most basic method. We’ll cover a more advanced technique later on in this tutorial.
After creating the branch, let’s run the Git branch command again to validate whether a new branch has been created or not in our local system.

Note: The creation of our branch in the local working directory is now complete. Notice the “*” in front of the “dev” branch. The star means that this is the current branch we are currently on.
What Does The “Git Branch” Command Do?
You can do many things with the “git branch” command. Here are those:
- Creating new local branches
- Deleting existing local or remote branches
- Listing local and/or remote branches
- Listing branches that, e.g., haven’t been merged yet
Different Ways to Create Git Branch
We can create a Git Branch in the following ways:
- Create a new branch based on the current HEAD
- Creating a Git branch using checkout
- Create a Git Branch without switching.
- Create a Git Branch from Commit
- Create a Git Branch from Tag
- Create a new branch from a remote branch
- Create a new branch in a remote repository
How To Create a Feature Branch In Git based on the current HEAD?
To create a new Git branch, use the “git branch” command and specify the name of the desired branch. This can be done while remaining on your current (HEAD) branch.
git branch <branch_name>

Create a Git Branch Using Checkout
The easiest way to create a Git branch is to use the “git checkout” command with the “-b” option for a new branch. Next, you just have to specify the name of the branch you want to create! Creating branches has never been easier!
git checkout -b <branch_name>
If you want to create a new branch from the master branch, you can use the “git checkout” command with the “-b” option. For example, if you want to create a new branch named “feature,” you would run:
git checkout -b feature

When you use the “git checkout” command, you’re creating a new branch and automatically switching to that new branch. But what if you want to create a Git branch without automatically switching to the new branch?
Create a Git Branch without switching.
You can create a brand new Git branch without even switching to it using the “git branch” command followed by the name of your desired branch.
git branch <branch name>
By this, we can create a new branch, but if you want to switch to another branch, you can use the git checkout command. So you can use the git checkout command like below:
git checkout <name the branch to which you want to switch>

You can check all the existing Local and Remote repositories branches by running the “git branch” command with the “-a” option!
git branch -a

Create a Git Branch from Commit
In the earlier of this post, we see how to create a new branch from the HEAD commit of your current branch, but what if you want to create a Git branch from a specific commit in your history?
To create a Git branch from a commit, use the “git checkout” command with the “-b” option and specify the branch name as well as the commit to create your branch from. This is an easy way to start working on a new feature or bug fix without affecting the current working copy of your code.
git checkout <branch_name> <commit_sha>
If you want to try with the git branch command, then you can try the below:
git branch <branch_name> <commit_sha>
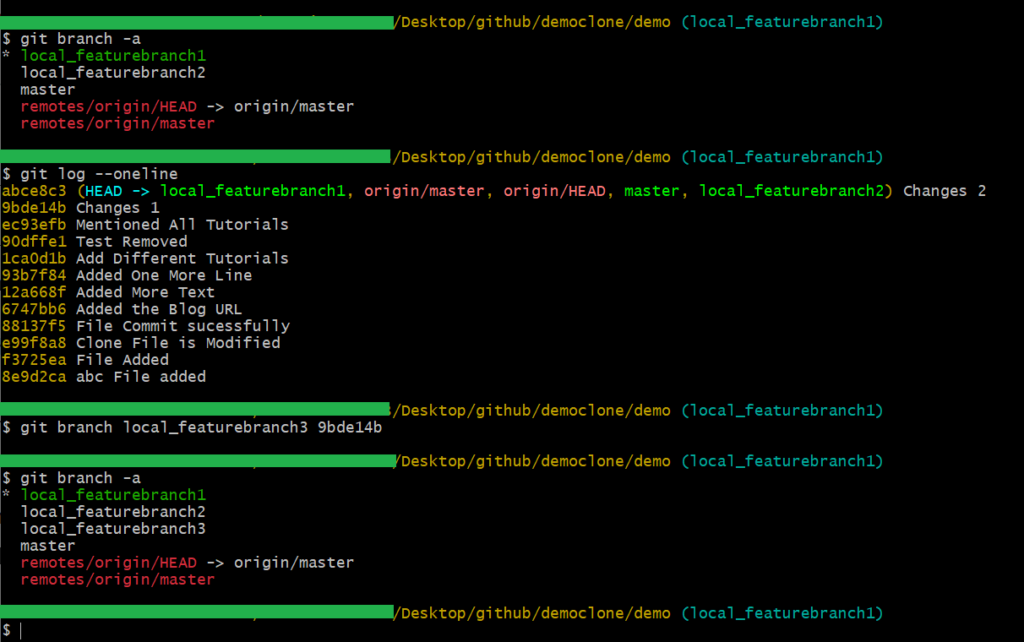
Here, in the place of commit_sha, you have to give the commit ID. So, if you know how to get the commit, then you can get it on your own; otherwise, you can check our previous blog post on Git Log Command, where we have described that in a detailed manner.
Or, in simple, you can use the git log command with the –oneline option to see all the commits of that branch. After that, you need to execute the above-discussed command.
For Example git branch future2 <commit id>
After this, you can execute the git branch command to see the new branch, and now, if you run the git online command, you can notice the newly created branch will appear on the respective commit.
Create a Git Branch from Tag
In our previous tutorials, we saw how Git tags can be really useful. They act as reference points in your development process and help you keep track of different versions of your code. It can be useful to create Git branches from existing tags – this way, you can work on new features while still maintaining a stable release.
To create a new Git branch from a tag, simply use the “git checkout” command with the “-b” option. Specify your desired branch name and the tag name, and you are all set!
git checkout -b <branch_name> <tag_name>
In our Earlier post, we mentioned for checkout command use when you use the Git checkout command it will change the branch. So, if you want to create a branch, but it should not change, you can take the help of the git branch command.
git branch -b <branch_name> <tag_name>
Let us know the implementation:
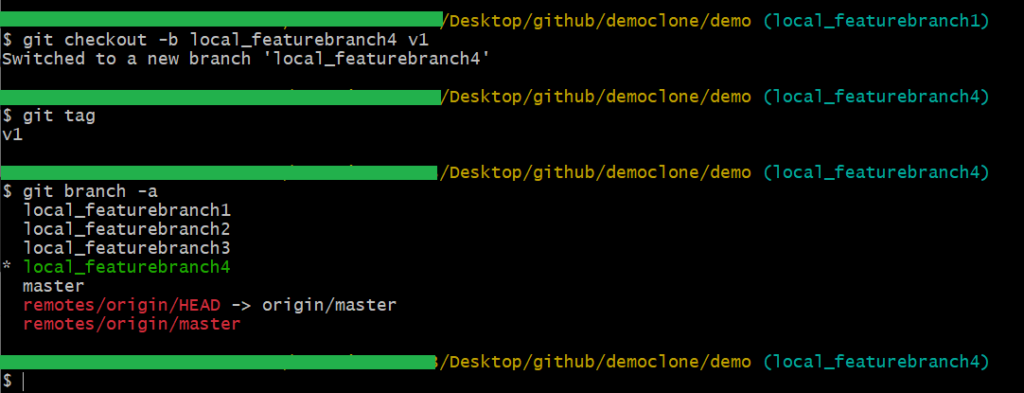
For example, there is a branch called Feature, and we have a tag named v1 (version 1). If you don’t know how to create a tag, then we have written a detailed post about Git Tag you can read that.
If you want to list your existing tags, use the “git tag” command. Or, if you want to find a tag associated with a commit, use the “git log” command.
git tag
You’ve found your tag! Now, create a new branch from it using the “git checkout” command.
git checkout -b <branch_name> <tag_name>
You can easily check your Git history to confirm that your new branch was created from the tag. Use the following command to see your Git history: git log –oneline –decorate
If you want to create your branch with the Git branch command, then you can do that, too.
git branch -b <branch_name> <tag_name>
How to create a new branch from a remote branch?
If you need to checkout a remote branch based on your new local branch, you can use the “–track” option:
git branch –track <new branch> origin/<base branch>
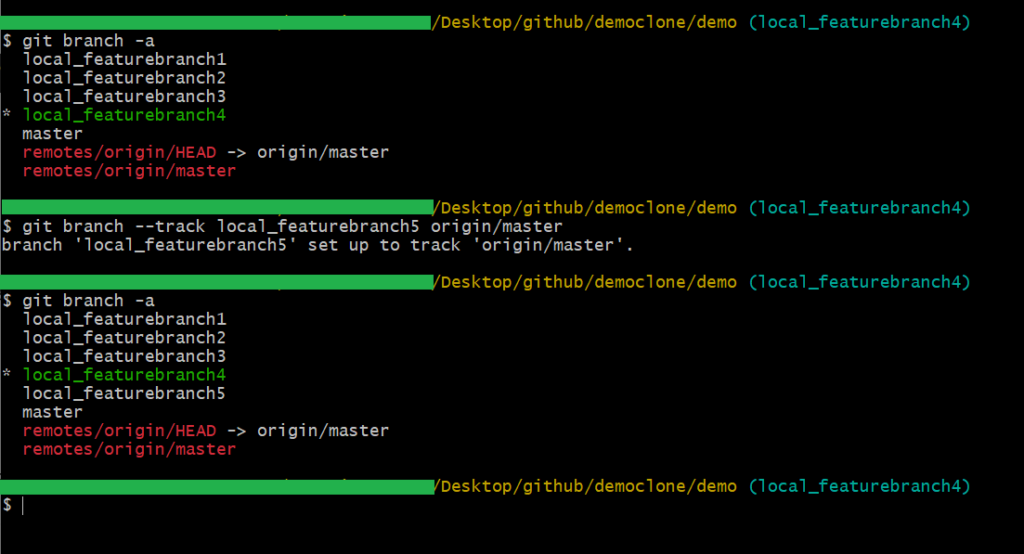
If you want to create a local branch that is named the same as a remote branch, you can use the “checkout” followed by the name of the remote branch. For example, if you want to name the local branch like the remote one, you only have to define the remote branch’s name once.
git checkout –track origin/<base branch>
How to create a new branch in a remote repository?
Up to this point, we have learned how to create the Git Branches by following different methods. But let us try to find out if the branches are in our GitHub account or not. So, to validate this, you must visit your Github account and check the branches dropdown.
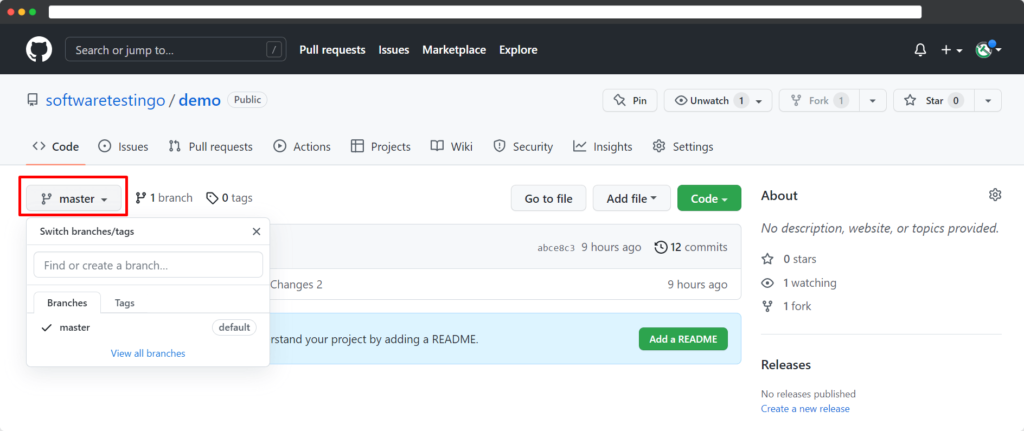
I do not see the new branches that I created locally, and it shows the old ones. You are correct that newly created branches are created in the local repository.
To make those branches in the remote repository, we have to push these changes to the remote repository, and you will need to use the git push command. Let’s try this and see if it works as expected.
git push -u origin <local-branch>
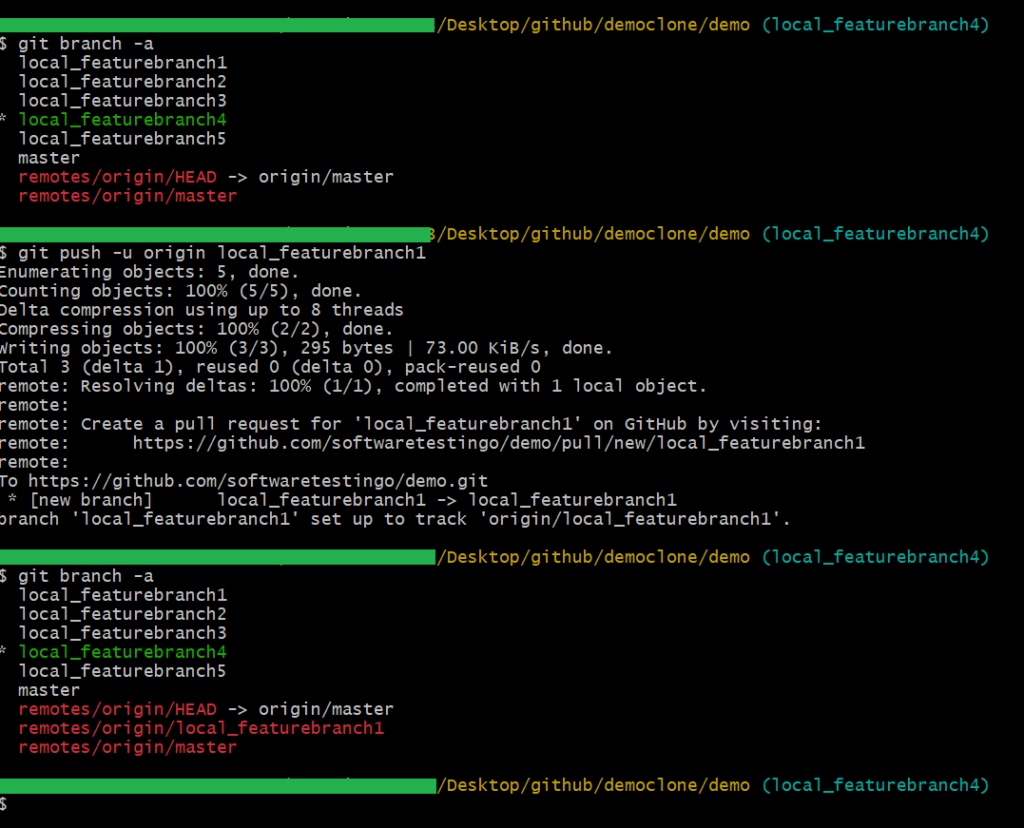
The “-u” flag tells Git to establish a “tracking connection”, which will make pushing and pulling much easier in the future. By establishing this tracking connection, you can ensure that your local changes are pushed to the remote repository and that the changes on the remote repository are pulled down into your local repository.

This message is to let you know that our branch has been successfully set up and tracked on GitHub.
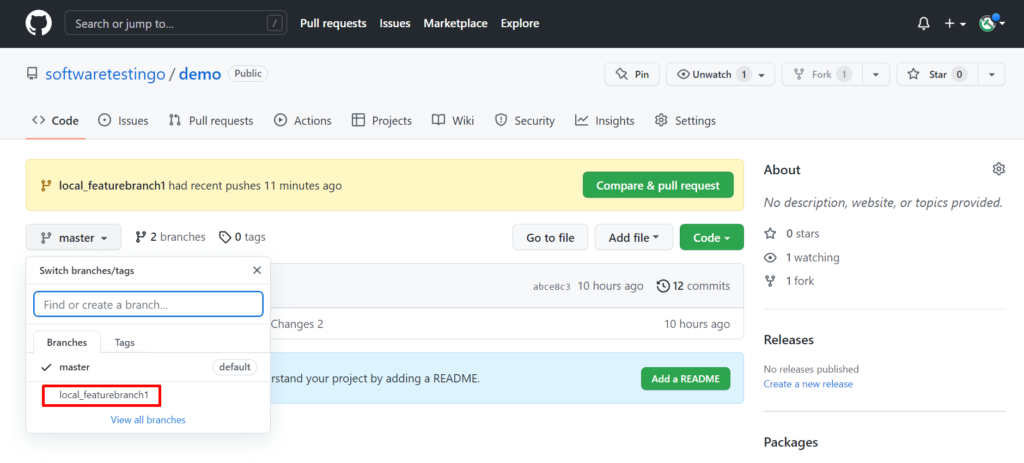
The new branch was successfully added and synced in the GitHub remote repository!
Push All Local Branches to Remote Repository
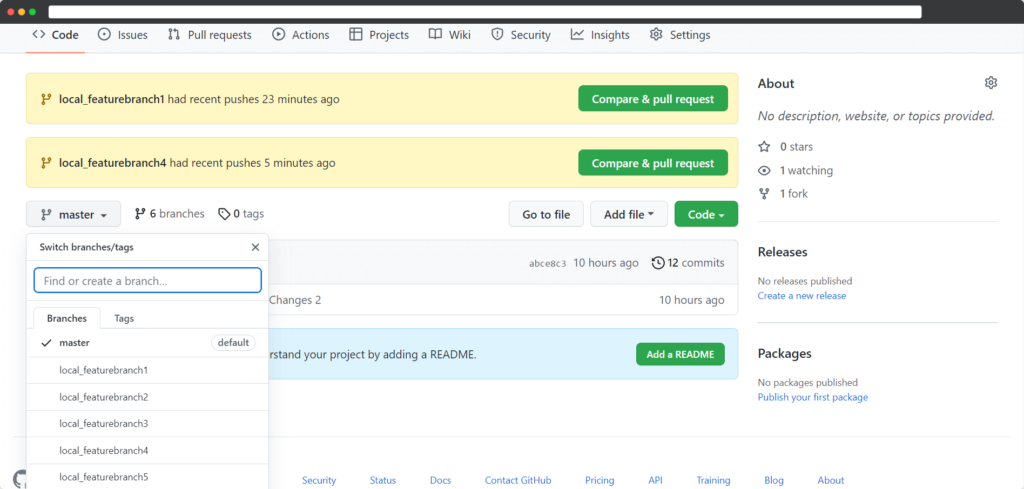
But If you follow the above steps, we can push only one local branch to a remote repository. So, push all local repository branches to the remote repository you can use the git push command followed by the –all flag and origin.
git push –all origin

You can confirm by visiting your Repository on GitHub
How to Switch Branch in Git?
In order to work with multiple branches effectively, it is important to know how to switch between them. Additionally, knowing how to work on each branch separately can be helpful. Switching branches is a common operation, so it is also essential for us.
We can find out the current branch name, which is visible alongside the directory name.

Switch to the other branch name by executing the below command:
git checkout local_featurebranch1
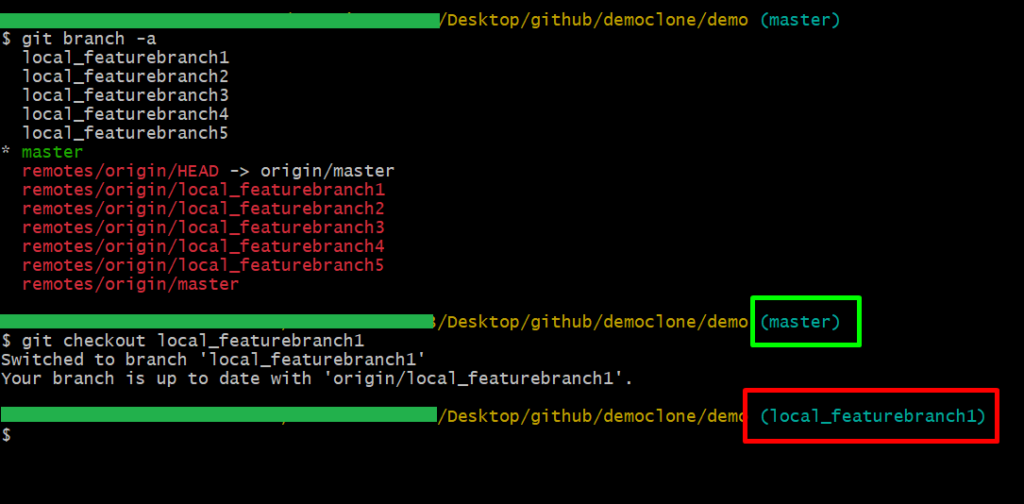
In this way, we can switch from one branch to another branch. After switching to the other branch, whatever operation you will do on that branch, the log will stay on that branch only.
Conclusion
Now that you know how to create branches, go ahead and experiment with them! Try creating a few branches and merging them back into your master branch. Also, we have learned how to use the “git branch” command so you can stay on your current branch if you don’t want to switch automatically.
Finally, we have seen some of the more advanced uses for branches in Git. Creating branches from specific commits or tags lets you keep a history that is tailored specifically to your needs. But let us know how you create the branches in your daily life or in your organization.
