In the last tutorial, we went over some of the most popular and important commands in the git log command. These commands are used very frequently in Git. But this post will briefly discuss another Git command, the Git diff command.
Before reading this article, we believe you have knowledge of the below topics:
- What is Git, and Why use it?
- Git Commit
If you have no prior knowledge, then you can refer to our previous articles on git tutorial and then only read this article for a better understanding of the git diff command.
| Post Type: | GIT Tutorial |
| Published On: | www.softwaretestingo.com |
| Applicable For: | Freshers & Experience |
| Get Updates: | Join Our Telegram Group |
Introduction to Git Diff Command
This git diff command is helpful for seeing the differences between two commits, branches, files, and more. By displaying changes with headers and metadata, you can more easily understand what has changed.
If you’re wondering how to see the differences between two data sources, diffing is the answer. Diffing is a function that takes in two inputs and shows the changes between them. This can be done with branches, files, and commits.
This tutorial will introduce you to the basics of diffing with Git and how to use the git diff command, with examples. After reading this tutorial, you’ll be an expert at using the git diff command.
What is Git Diff Command?
The Git Diff Command is useful for seeing the differences between files in two commits or between a commit and your current repository. You can use it to see what text has been added, removed, or changed in a file.
“Git diff” is a useful command because it produces output in a standardized format that helps you understand what changed and also allows those changes to be applied later. We’ll discuss the format in more detail later; let’s focus on why this command is so helpful.
Why Do We Use Git Diff Command?
When you are working on a project, it can be extremely useful to be able to make comparisons. This will help you to see:
- If you want to track down how a bug was introduced, it might help you to look back through your code changes.
- You can compare two branches to see what will happen when you merge them.
- You can observe how a particular file has changed over time, which can be helpful in understanding the effects of recent code changes.
- You can compare the changes made since the last commit to review what will go into the next commit.
How Do We Use Git Diff?
We have understood what the diff command is and why it’s useful. Let’s move on to learning how to use it with a simple example. In order to use the diff command, you will need to make some changes to your existing files. After that, only you have to execute the below command:
git diff
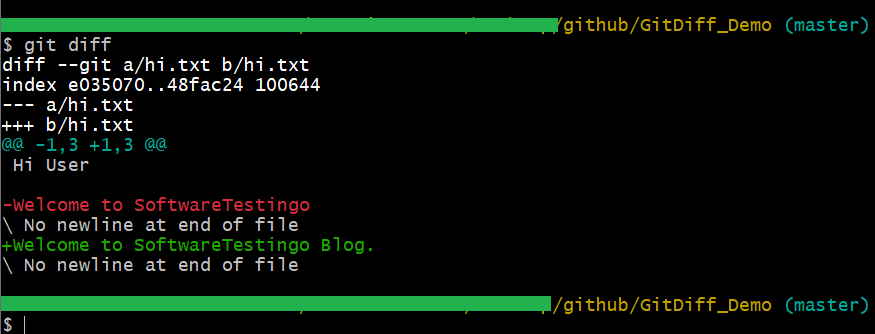
Note: If you would like to see the changes in all files, type “Diff Command.” If you would only like to see the changes on some specific files, type the name of those file(s) after “Diff Command.”
Now, let us try to understand the output provided by the git diff command.
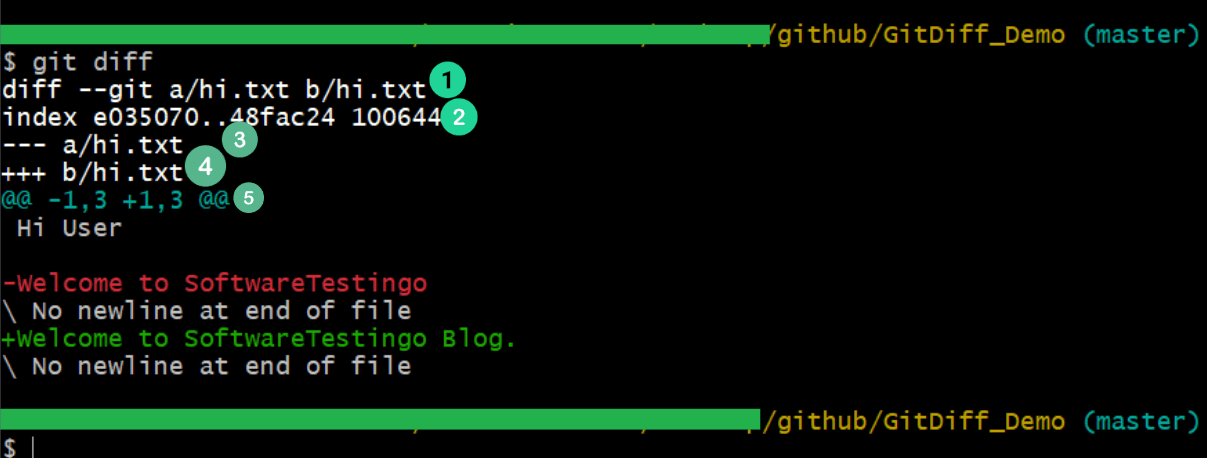
- The first line of the output from the diff git command shows the file names that were considered as input. A and B represent the two file states taken as input.
- The second line of the text shows the metadata related to the command and how it was executed on the files. This is the object hash value that Git requires for internal use, as was discussed in the Dot Git folder.
- This line defines the symbol, which we call a legend. It tells you what is used to describe the first file and what is used to describe the second file. As you can see, – is used in front of the first file, and + is used in front of the second file. So they will be marked accordingly whenever a diff shows you changes related to either file.
- Suppose the chunk looks something like this @@ -1,3 +1, 3 @@, which means that the first and third lines were changed in the first file, and only the first and third lines were changed in the second file. Remember to use the – and + symbols to denote which changes happened in each file.
Git Diff Commands Based On the File Operation
Basically, with a file, we can do the operation like adding or deleting the content of the file. So, let us try to find out how Git behaves when some data is added to the file and when the data is deleted from the file.
How does Git Diff behave when data is added to a file?
Before doing this operation, we need to check for any changes in the repository. If there is some change in the repository, then we need to commit those changes so that we can easily understand the changes.
So, to commit, you have to add those files to the staging area, and after that, you can commit those changes. If you are unaware of how to commit the changes to the repository, you can follow our previous post on the git commit command.
After successfully committing the changes, you can check the output you are receiving by executing the git diff command.

It looks like there haven’t been any changes, so we can go ahead and add more content to our file.
Suppose the previous content in the file is Hi Welcome All. Now let us add something to the file, and after adding content into the file, the final content is “Hi Welcome All to Softwaretestingo.” Now, after adding the content, run the git diff command one more time and notice the result.
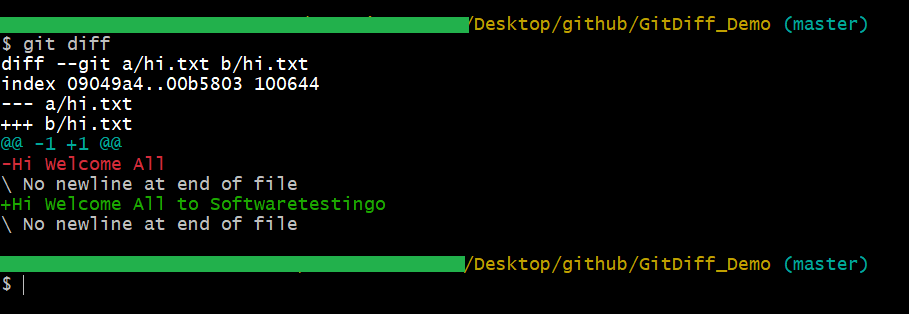
It makes sense that the first line would be different in both versions of the file since the changes are reflected there.
How does Git Diff behave when data is deleted in a file?
After completing the above section, save your changes by using the commit command. You can confirm that there are no remaining changes to be made by using the diff command as we did earlier.
If the file has content like “Hi Welcome All to Softwaretestingo,” from the content, delete the “Hi Welcome All to” and save the file after that, run the git diff command.
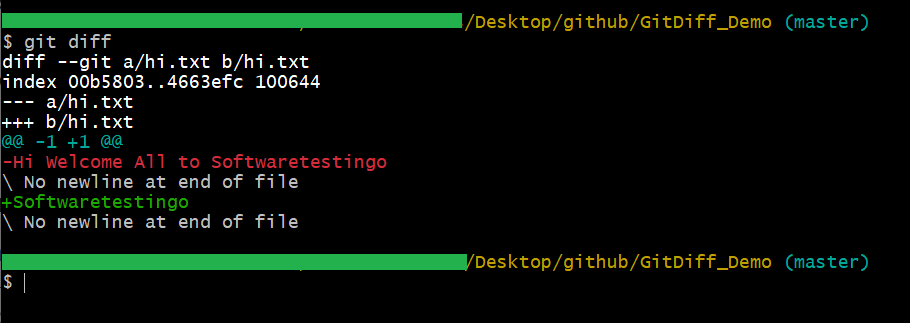
We guess you can understand the changes. If you’re having trouble understanding the screenshot, go back and review the points mentioned in the earlier section.
How do you see diff changes in one line?
It is clear from the screenshot that the latest changes are in green. The red text is not needed as much since we’re only interested in seeing what has changed, not how it looked previously. This doesn’t mean we don’t want to see the changes that have happened or the difference. We can use an option color word in the Git Diff command to clear it out.
To use the option, type the command:
git diff –color-words

Great, now the changes can be seen in one line only. The word in red indicates that it has been deleted from the original file, which is really helpful.
Note: If you want to see the changes that have not been staged, the usual git diff command will show them to you.
Git Diff Commands Based On the Scenario
There are some scenarios where we are using the git diff command, and those are:
- Track the changes that have not been staged
- Track the changes that have been staged but not been committed
- Track the changes after committing a file
- Track the changes between two commits
Git Diff File: Track the changes that have not been staged
The above discussed are examples of Tracking the changes that have not been staged because, in all the above examples, we saw how to use the git diff command.
Git Diff File: Track the changes that have been staged but not been committed
We’ve looked at how to see the changes made to a file that isn’t in the staging area. The git diff command also allows us to track staged but not committed changes. We can use the –staged option with git diff to see what’s changed in the staging area.
So, try to add the changed file to the staging area. If you have some prior knowledge, then add that file to the staging area otherwise, you can follow our blog post on How to add files to the git staging area.
Now, the file has been added to the staging area. You can view the changes that have been made in the staging area before committing them.
You’ve added the file to the staging area, but it’s not committed yet. You can track changes in the staging area by running ‘git diff’ with the ‘–staged’ option.


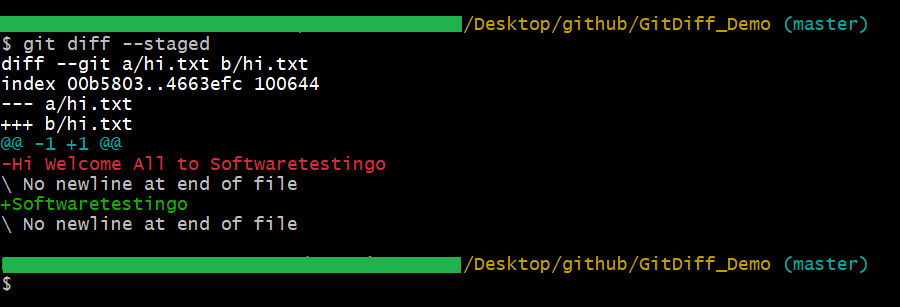
The output will be something like this, where we can see the changes in the file already in the staged area.
Git Diff File: Track the changes after committing a file
Git can help us track changes made to a file after it has been committed. For example, if we have already committed a file and then make additional changes, Git can also help us keep track of those changes.
Now, You need to commit the changes to a file. After committing, we need to change the content of the file to “File Content Changed.” Once you change the content of the file, you can see the changes by running the git command with the HEAD argument. The syntax for the command is:
git diff HEAD

Track the changes Git Diff Between Commits.
We can track the changes between two different commits in Git. To do this, we first need to have a list of commits so that we can compare them. The usual command to list the commits is the git log.
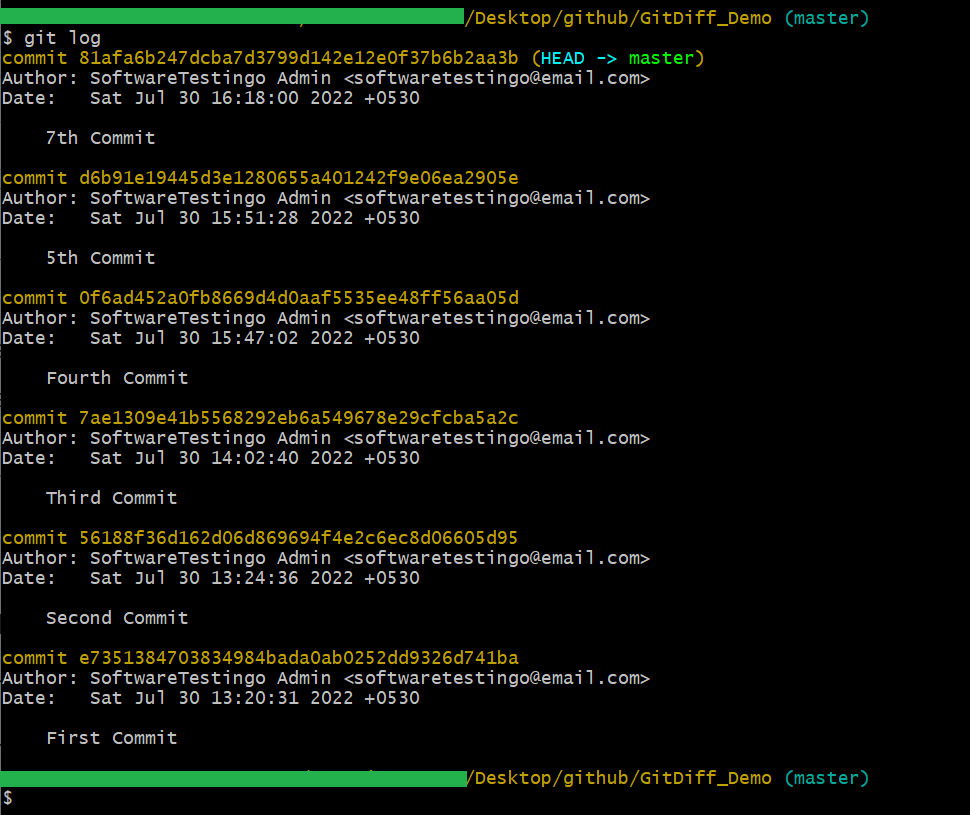
We need to track the changes of a specified file from an earlier commit. To do this, we must have the commits for that specified file. To see the commits of a specified file, we have to run the below command.
git log -p –follow — filename
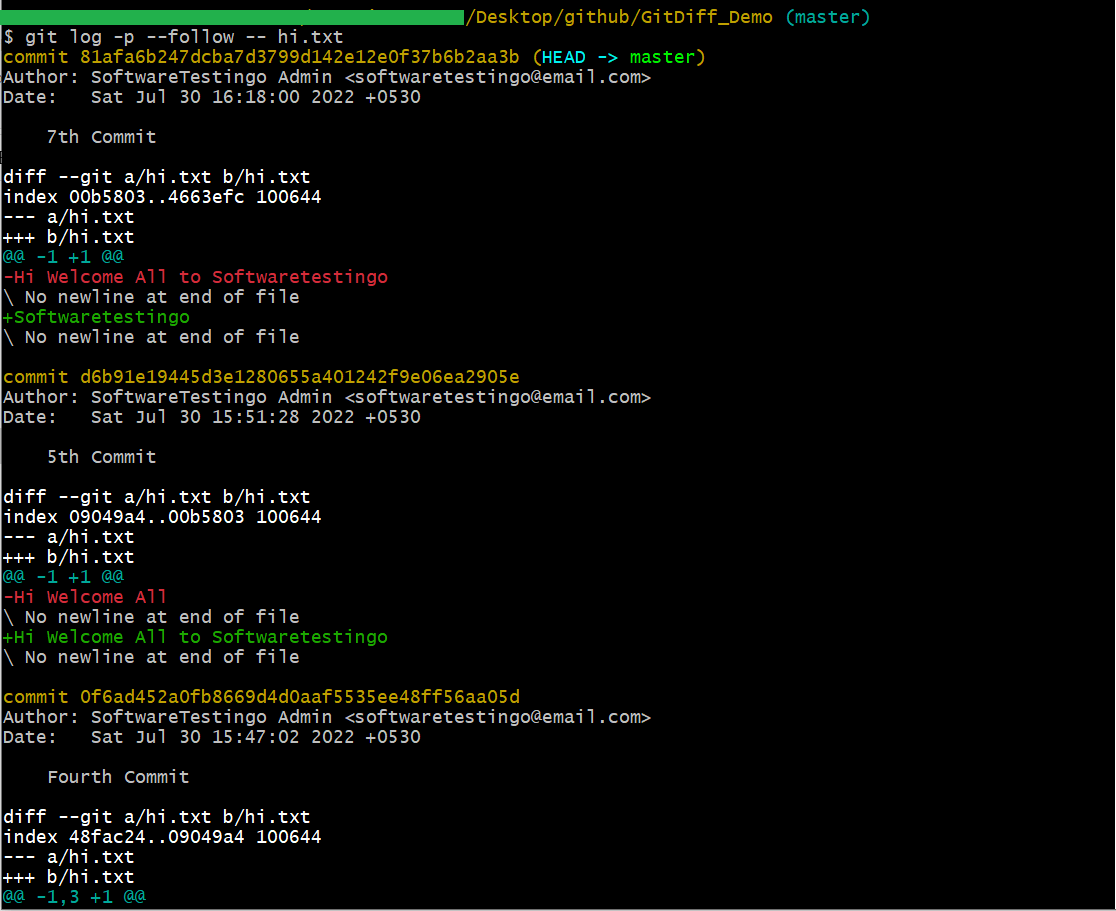
This will show all the commits of the file, but suppose we want to see the changes between two commits. In that case, we can use the git diff command. You can write the command below:
Git Diff Between Commits Syntax:
git diff <commit1-sha> <commit2-sha>
Example: git diff 9601d2736a31252beeedd3034d863f3ff3291ad1 f699c1bc39c8561ae1c4b15668e902c043a5917f

Git Diff Between Branches
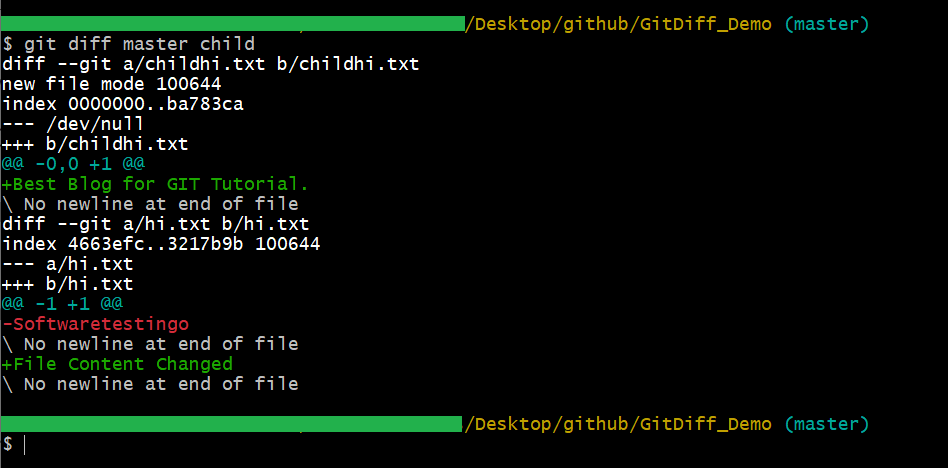
If you are good at branching, then you can understand the importance of comparing branches before merging. Many conflicts can arise if you merge a branch without comparing it first. To avoid these conflicts, Git has many handy commands that allow you to preview, compare, and edit the changes.
By using the git status command, we can easily track any changes that have been made to our branch. However, if we want a more detailed explanation of these changes, then the git diff command is exactly what we need. This widely used tool allows us to see precisely what has changed between the two versions of our code.
Git Diff Between Branches command like below:
git diff <branch 1> < branch 2>
Conclusion:
We discussed the process of git diffing and how to read the output of the git diff command. We provided examples of how to change the way git diff displays its information, including highlights and colors. We also went over different ways to compare files, such as those in branches or specific commits. In addition to using the git diff command, we also made use of the git log, git switch, and git checkout commands.
But after going through the document, if you have faced any problems, then let us know in the comment section.
