Git Fork a Repository: In our earlier post, we have seen how to create a GitHub account and how to connect our local repository with the GitHub repository. After connecting with the cloud GitHub repository, we can do two operations. You can push your code into your own/someone’s repository, or we can download someone’s/own repository into your local system.
This blog post will explain how to copy someone else’s repository into your own account. The reason for doing this is straightforward: it allows you to make changes or use the repository for your purposes.
If you want to contribute to a public repository (or even a private one that allows it), this tutorial is for you. We’ll cover “forking” in Git and how it can help you make your contributions easily.
What is Git Fork and Forking in Git?
Forking is the way to go if you want to change a project or play around with someone else’s code. With forking, you can take any project and create your copy of it—you can make whatever changes you like without affecting the original repository. Plus, if you fork a project on GitHub, you get all the benefits of working in a collaborative environment.
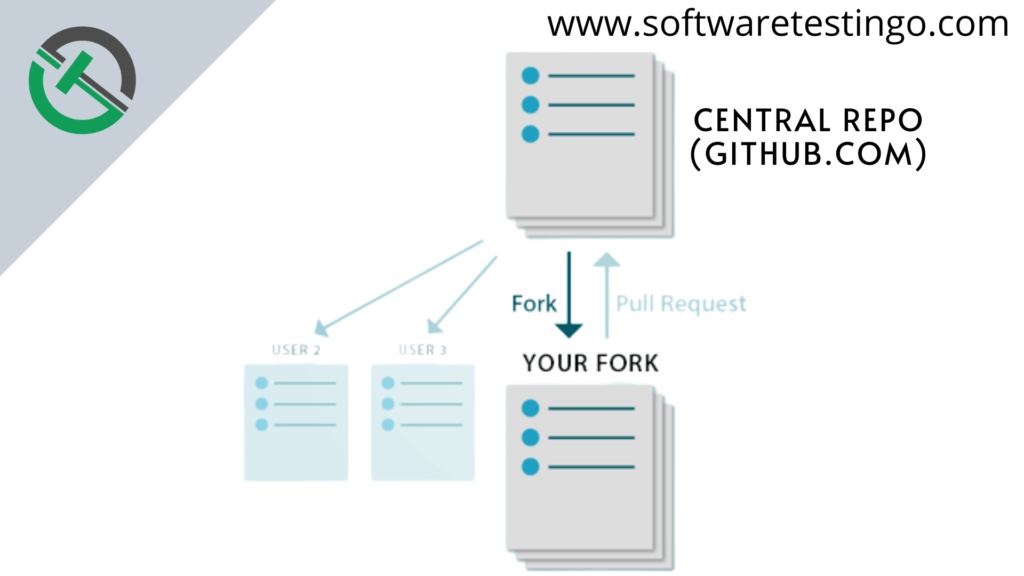
Why Fork a Repository on GitHub?
Forking a GitHub repository allows you to have your copy of the upstream repository in your account. But why would we need to fork a repository developed by someone else?
GitHub is a platform developed to provide a space for developers worldwide to contribute to each other’s projects and create more reliable software. It is understandable that no one would want to see hundreds of changes made without their consent on the original repository, so the concept of forking a repository comes into play. Forking a repository creates a copy of the original where you can make changes without affecting the main project.
We are doing the Git Fork mainly for two reasons and is:
Improving Existing code/software: If you see something in someone’s code that could be improved, don’t hesitate to suggest a change! It doesn’t have to be a bug fix – even small changes can make a difference.
Example: If you find a repository that you like the concept of but think of something that could make it even better, you can fork the repository. This means making your own copy of it on your own machine. Then, you can develop the new feature on your machine and send the changes to the owner of the original repository for them to review and potentially add to their project.
Reusing the code in a project: If you come across a repository that would be perfect for your project but not yours, you can fork the repository to use in your own project. This saves you from having to reinvent the wheel.
Note: “Forking” means copying a repository from one user’s account to another. If the original repository is public, anyone can fork it without asking the owner for permission. However, if the repository is private, you can only fork it if you have the owner’s permission.
How does Forking (Git Fork) work?
Forking a repository on GitHub is a simple process that doesn’t require any git commands. The git fork process follows the below steps:
Fork a Repository: In this step, the user forks a repository to his own GitHub account. We are going to discuss this in our upcoming blog spot of the Git tutorial series.
Code changes: The user makes changes and pushes them back to their own forked repository.
Send changes to Original Repository: This process is called Pull Request in Git. The user sends the changes to the owner of the repository as a request at this step. Now, it is up to the owner to accept or reject the changes.
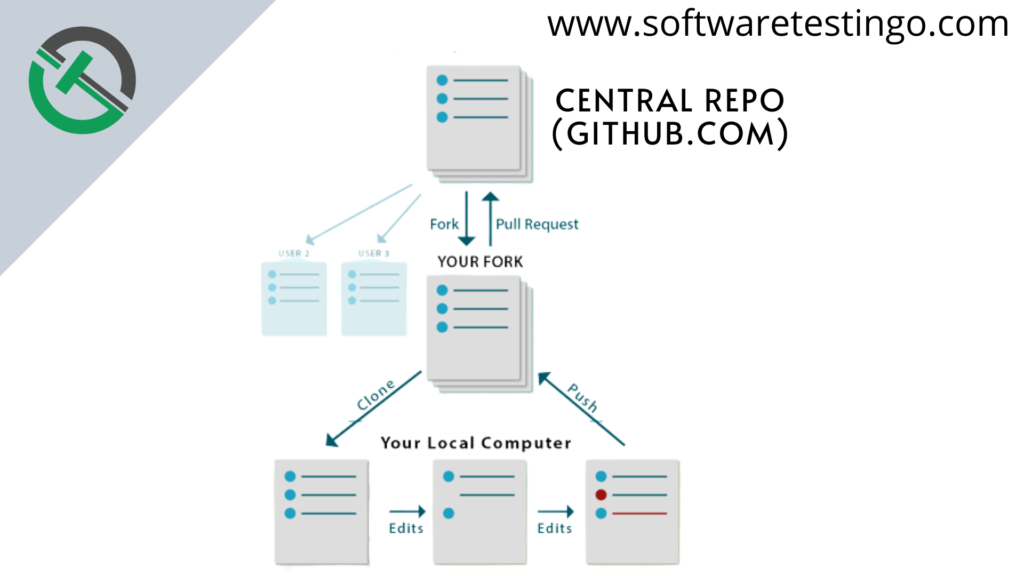
We have discussed all the Git Form process flow, but we will try to learn how to do that.
Git Fork
Earlier in this post, we mentioned that to fork a Git repository, there is no need for permission from anyone. So, in our example, we tried to fork a public repository.
How to Fork a Repo?
To explain these, let us take an example for a better understanding of how Git Fork is working. So, to explain this, we will take the help of two accounts, stuser2022 and SoftwareTestingo.
Scenario: So Here, the stuser2022 wants to Fork the repository of the SoftwareTestingo user.
To fork a repository, you need to log into your GitHub account (stuser2022 ). Suppose you are aware of whom activity you want to fork or the repository name. In that case, you can use the Owner name (SoftwareTestingo) or the Repository name(demo) to find out the repository from the GitHub repository list.
For Search, you can enter the Owner or Repository name in the GitHub search bar and check whether All GitHub is selected. Then press enter.

When you search for this, you will get a message like the one below for your query.

It looks like you’re trying to find the Softwaretestingo repository. If you take a look at the left column of your screen, you’ll notice that Repositories is selected by default. Since there’s no repository with the name Softwaretestingo, that message appeared. We know that Softwaretestingo is a user name, so select Users in the list, and hopefully, you’ll find it.
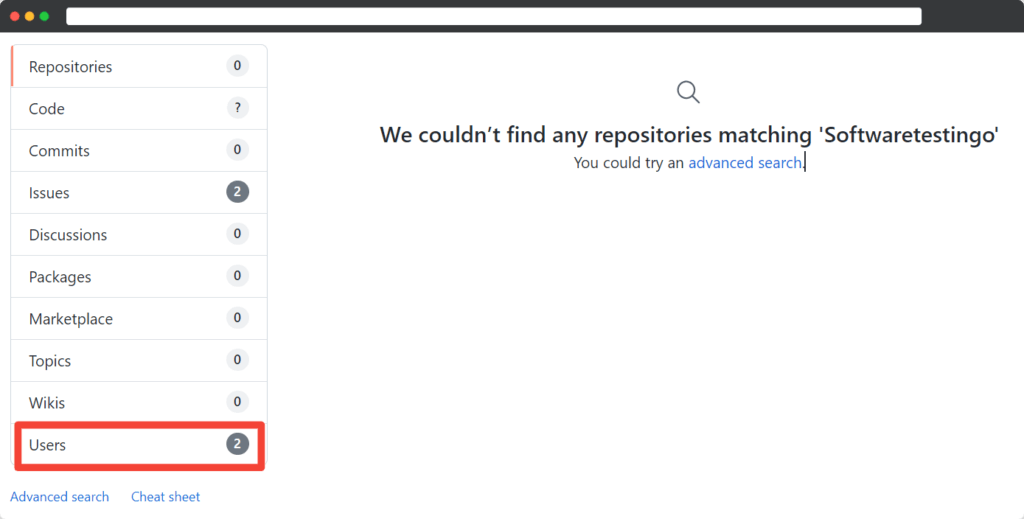
If you see a number in front of a user’s name, that means there are two or more users with that same name. From that, select the required user.
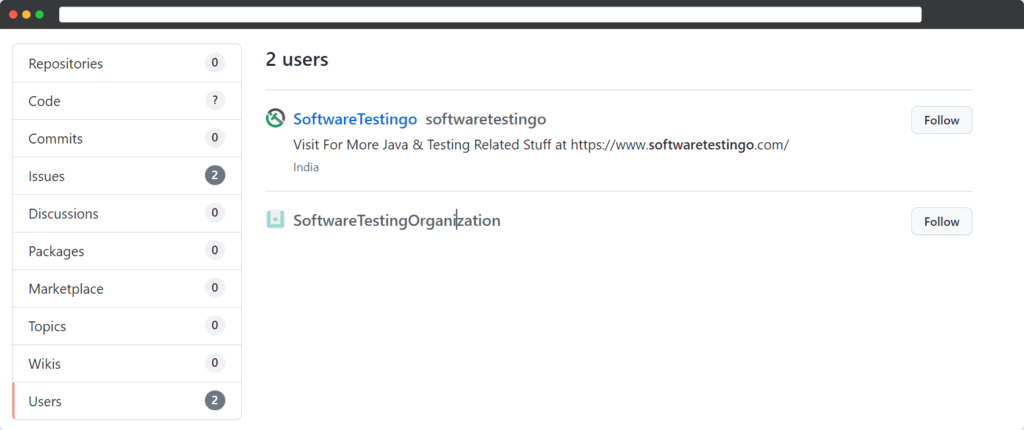
Click on the username, and It will be redirected to that specific user’s profile page, where you can see all the public repositories of that specific user.
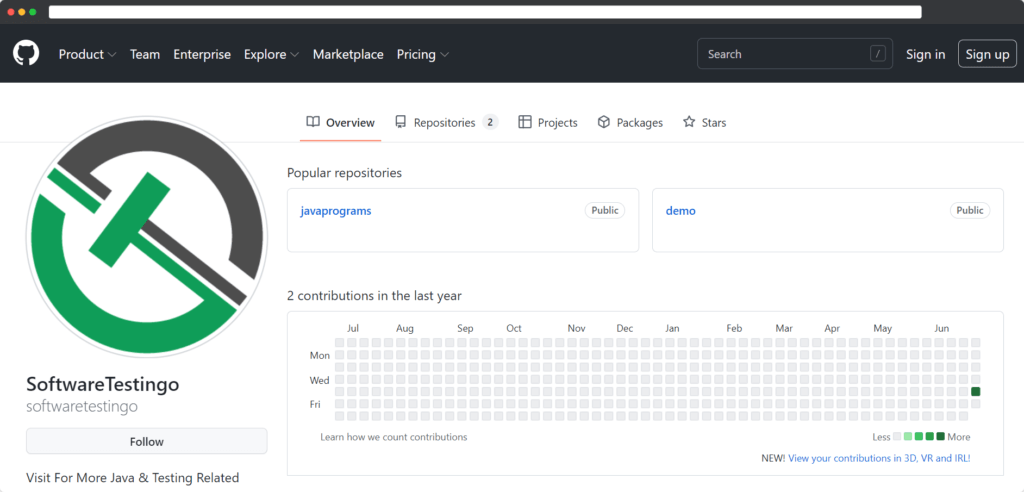
Select the demo repository from the popular repositories list. Click on the demo repositories so that they will redirect you to the repository page. There, you can see the Fork button.
You can press the Fork button to initiate the Git Forking process.

Before Forking any repository, there should at least one commit should be there. Otherwise, you can not fork that repository.
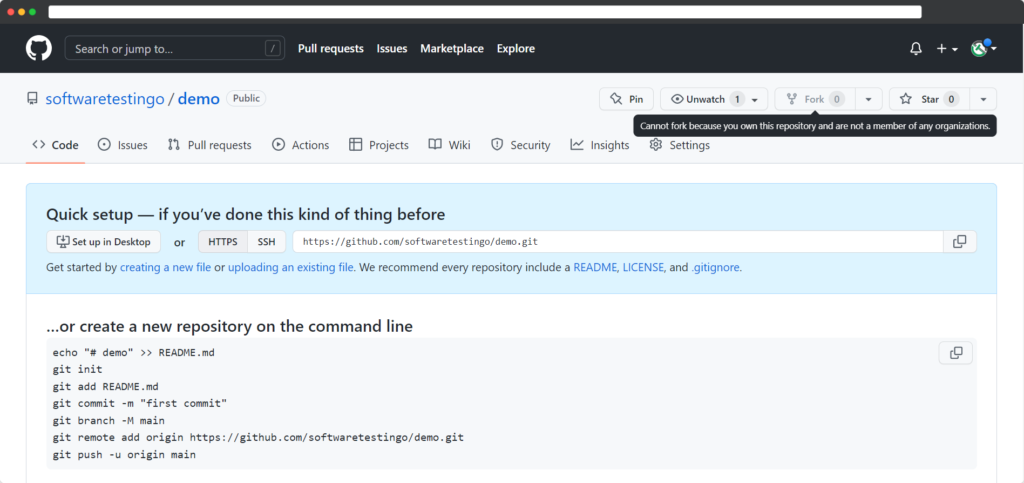
Note: If a repository is empty, then you can not fork that repository. When you hover over the fork button, you will get a message: “cannot fork because the repository is empty.”
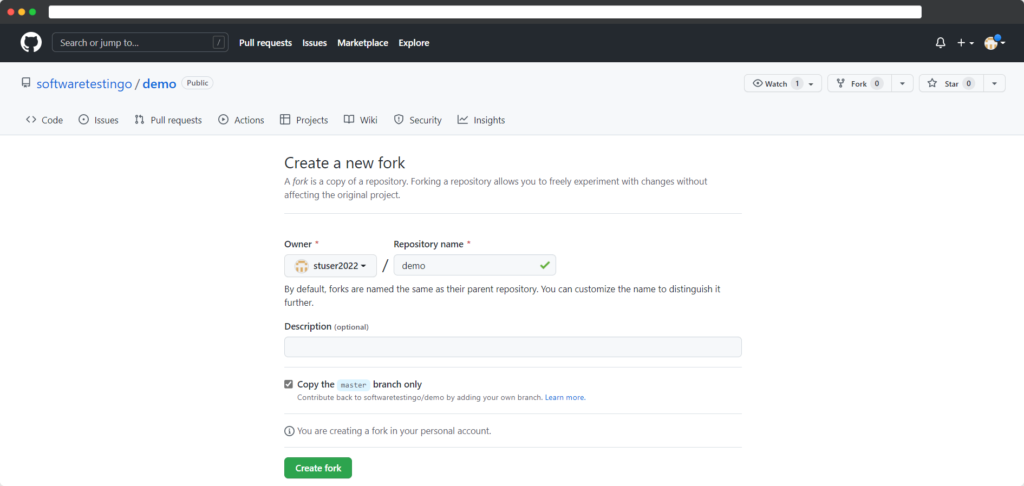
When you click on the Git Fork button, the user will be redirected to the Create New Fork Page. Here, by default, GitHub will display the same repository name that the Creator of the repository gave. You can change the repository name if you want to change it. Finally, to complete the Fork process, you have to click on the Create Fork button.
When you look at the repository after forking, you’ll see your username instead of the creator’s name! This shows that the repository was successfully forked to your account. And also, you can notice the count of Forks also increased.
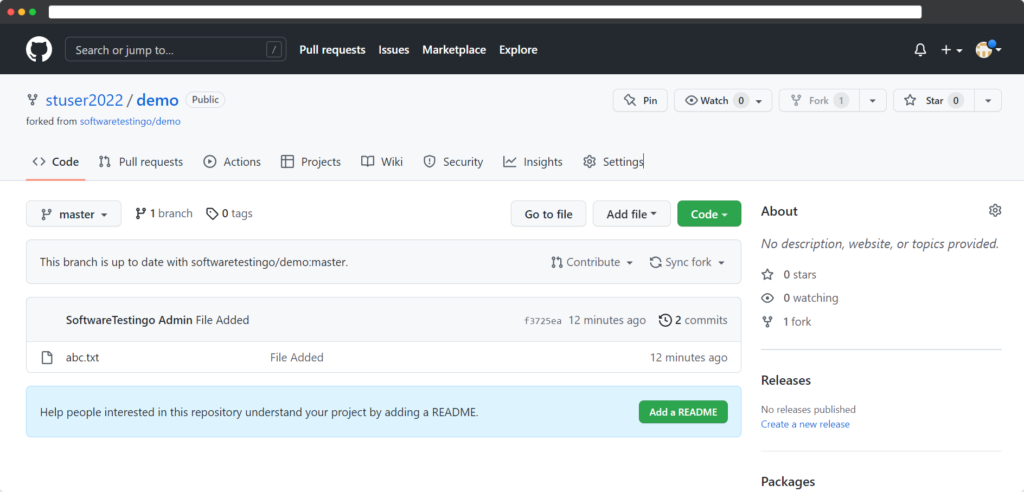
Now that you’ve forked the repository using Git, you can modify and improve the code however you see fit. There will also be times when you’ll want to delete your fork entirely.
How To Delete A Forked Repository?
If you need to delete your forked repository, you can do so at any time. This may be because the requirement is finished or because you want to have fewer repositories in your list when you’re done making changes.
Deleting a forked repository also saves memory since GitHub creates a pointer from the original repository to the forked one (which takes up extra space). These are just a few reasons – there could be any number of reasons why someone would want to delete their fork repository.
Don’t worry; and this is a simple process. Just remember not to delete the repository until the changes have been merged into the original repository or you are absolutely sure about deleting it. Once you delete it, all changes will be lost.
Let’s delete the forked repository that we created in the last section. To do this, go to the repository page from which we forked it. You can find a link to this page in the left column of your dashboard under “Repositories.”
Follow the steps:
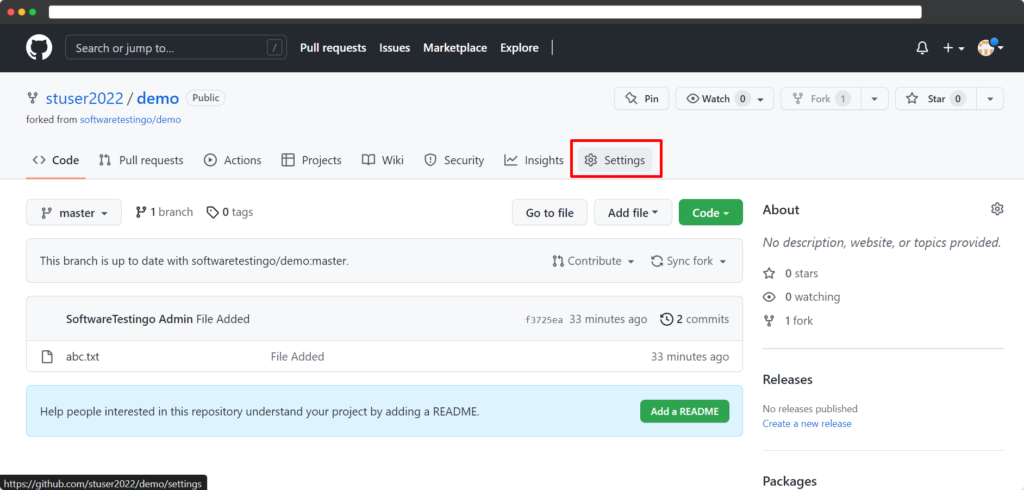
Go to the GitHub repository page and click on the settings tab.
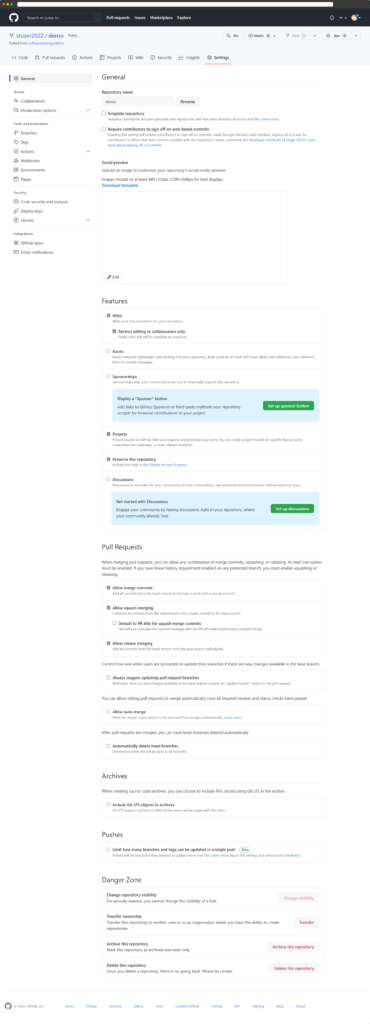
The user will be redirected to the settings page; after that, you need to scroll down to the bottom. Go to the Danger Zone section.
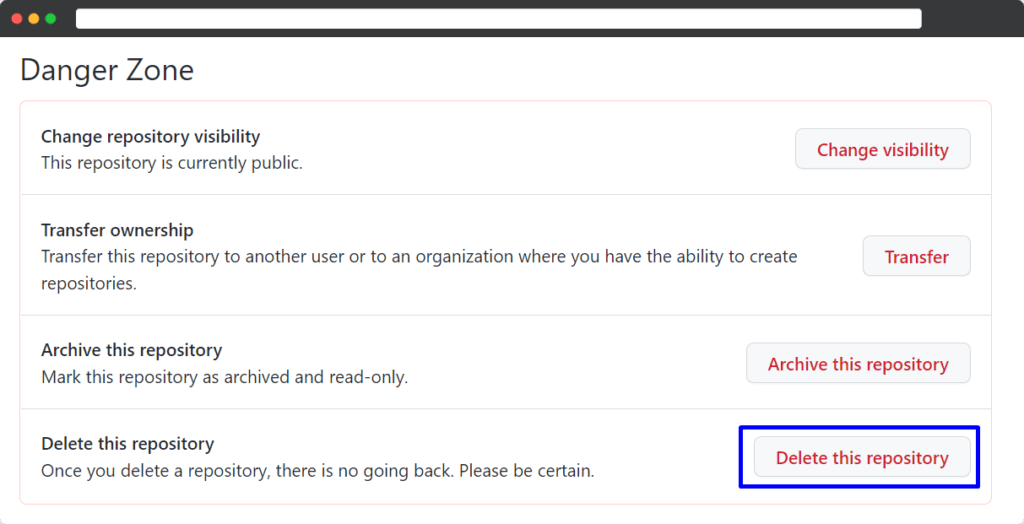
From there, click on the Delete this repository button.
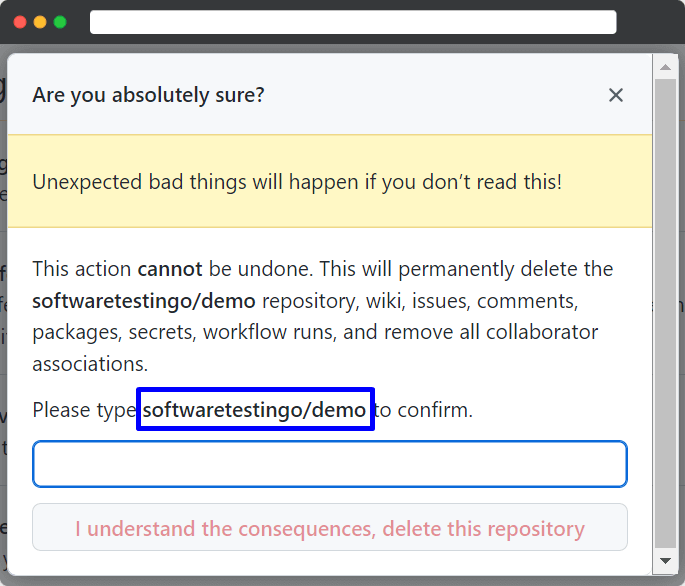
On clicking on Delete, this repository a popup will be displayed where you have to enter the repository name as displayed in the popup. After entering the repository name, you have to press the I understand the consequences and delete this repository from the popup.
Once the repository is deleted from your GitHub account, you can see the below successful message.

